

UNBOXING & MANUAL
WHISPER
First-Time Use

Unpacking

Product Activation
Operation and Setting

Light Control

Time Setting

Alarm Setting

Sleep
Mode

Volume Setting

Healing
Sound
First-Time Use
Unpacking
Activate WHISPER
1.Retrieve the USB charging cable from the carton, and connect it to the lateral side wooden base of WHISPER. A short “beep” is emitted when connected.
2.Touch the left and right button “< >” located at the base, and select settings on the display panel. -> Press the “-” button to confirm setting.

Operation and Setting
Light Control

1.A short “beep” emitted from WHISPER once connected indicates successful connection.

2. Touch the circular “brightness control button” located on the base to adjust ->
(1) Short Press: 3-level adjustment
(2) Long Press: stepless adjustment
Time Setting
1. A short “beep” emitted from WHISPER once connected indicates successful connection.

2.Touch the “< >” left and right buttons at the base, and select “00:00” as indicated on the display panel. -> Press the “-” select button on the right to enter time setting.

3.Touch the “< >” left and right buttons at the base, and select “12HR” or “24HR” as indicated on the display panel. -> Press the “-” select button on the right to confirm on the hour system.
4.Touch the “< >” left and right buttons at the base, and select “SET” as indicated on the display panel. -> Press the “-” select button on the right. -> Press the “< >” left and right buttons to adjust the time. -> Press the “-” select button on the right to complete the time setting.
Press the “-” select button on the right. -> Press the “< >” left and right buttons to adjust the time.
Press the “-” select button on the right to complete the time setting.
Alarm Setting
1. A short “beep” emitted from WHISPER once connected indicates successful connection.

2.Touch the “< >” left and right buttons at the base, and select “(( 🔔 ))” as indicated on the display panel. -> Press the “-” select button on the right to enter alarm setting.

3.Touch the “< >” left and right buttons at the base, and select “🔔 Light” and “🔔 No Light”. -> Press the “-” select button on the right to confirm on the sound and light mode.

4. Display panel is indicated with “00:00”. -> Touch the “< >” left and right buttons to adjust the time. -> Press the “-” select button on the right to complete the alarm setting.

5.Display panel is indicated with “-“and “+”. -> Touch the “< >” left and right buttons to adjust the volume. -> Press the “-” select button on the right to complete the alarm volume setting.

6.The indicator light on the right will flash orange after alarm setting is complete.
Sleep Mode Setting
1. A short “beep” emitted from WHISPER once connected indicates successful connection.

2.Touch the “< >” left and right buttons at the base, and select “zzZ” as indicated on the display panel. -> Press the “-” select button on the right to enter sleep mode setting.
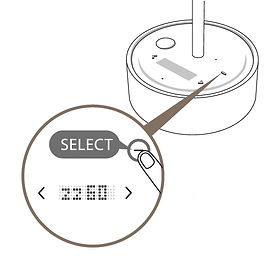
3.Touch the “< >” left and right buttons, and select “zz30” or “zz60” on the display panel. -> Press the “-” select button on the right to confirm on the countdown time.
Volume Setting
1. A short “beep” emitted from WHISPER once connected indicates successful connection.

2.Touch the “< >” left and right buttons at the base, and select “VOL” as indicated on the display panel. -> Press the “-” select button on the right to enter volume setting.

3.Touch the “< >” left and right buttons at the base to increase and decrease the volume. -> Press the “-” select button on the right to confirm on the volume.
Healing Sound Setting
1. A short “beep” emitted from WHISPER once connected indicates successful connection.

2.Touch the “< >” left and right buttons at the base, and select “🎵🎵” as indicated on the display panel. -> Press the “-” select button on the right to enter healing sound setting.

3.Touch the “< >” left and right buttons at the base, and select “🎵1”, “🎵2”, or “🎵3”. -> Press the “-” select button on the right to confirm on the healing sound.